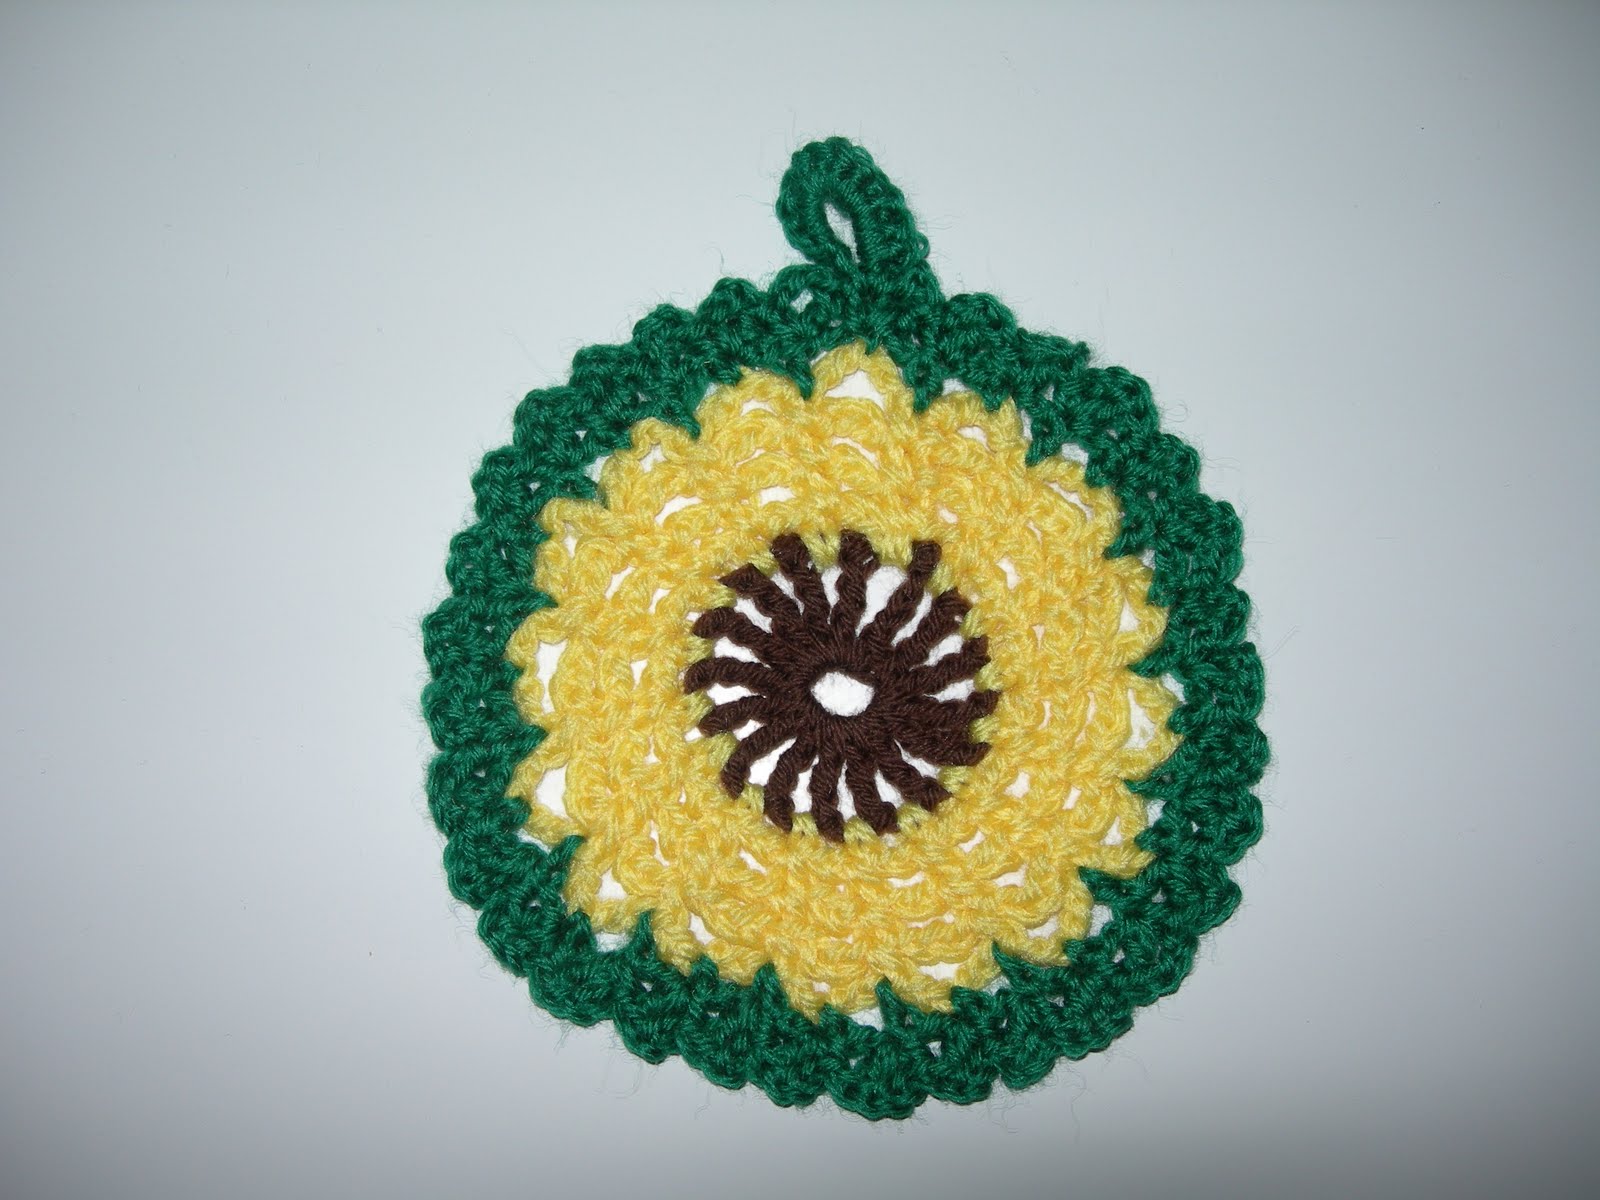
Wednesday, December 4, 2013

 Baby gift sets


Baby frock


Baby crochet dress

Friday, September 23, 2011

Eyeglass Case

bookmarks

Pretty Pineapples Bookmark


flower bookmark
shell bookamrk
fan bookmark
Materials:

- size 10 thread
- size 1 (one) hook (that's the only size I have, use whatever size you prefer)

Size: 2 3/4" x 2 3/4"

Directions:

Row 1: Ch 4, 7 dc in 4th ch from hook. Ch 3, turn. (8)

Row 2: Dc in same st. 2 dc in next 6 dc, 2 dc in top of ch 3. Ch 3, turn. (16)

Row 3: Dc in same st. *Dc in next dc, 2 dc in next dc. Repeat from * across. Dc in top of ch 3. Ch 4, turn.

Row 4: *Dc in next dc, ch 1. Repeat from * across. Dc in top of ch3. Ch 1, turn.

Row 5: Sc in same st. Sc in each dc and ch 1 space across. Ch 7, turn.

Row 6: Sc in same st. *Ch 2, skip next sc, sc in next sc. Repeat from * across. Ch 7, sc in same last sc. End off.

Cut three (3) 24" lengths of thread. Fold in half and pull loop through chain that the 1st row of 8 dc were worked in. Pull ends through loop and tighten.

Art of Needle and Hook: Cell Phone Case

Art of Needle and Hook: Cell Phone Case

Cell Phone Case


its also i made my self............

Trinket Bowl


I made this pattern by my own with beads.

Use them to store small items, or just for decoration. A trinket bowl will be able to contain all those little mementos such as photos and beads as well as precious ear rings, rings and anything else that has a priceless personal value to you.

Sunday, May 31, 2009

FREE Pattern of the Day » Rainbow Sherbet » Crochet


The popular ripple pattern is given new life using a reversible technique!


Skill Level

Intermediate
Finished

Size36 x 46 inches
Materials


Bernat Softee Baby sport weight yarn: 5 oz white #2000, 7 oz assorted scrap colors
Size H/8 afghan crochet hook or size needed to obtain gauge


Tapestry needle
Gauge

Point to point = 3 1/2 inches;

2 rows = 1 inch

Check gauge to save time.


Pattern NotesWeave in loose ends as work progresses.Each colored row (consisting of a work-off pass and a pick-up pass) requires approximately 14 yards.For the return portion of a row when you work the next lp off the hook following the ch 3 it actually creates a 4th ch so that on the next row when you sk a ch, pick up a lp in each of the next 2 chs, you will be picking up lps in the center 2 of 4 chs.


Afghan

Row 1: With desired scrap color, ch 244, retaining all lps on hook, working through bump on back of ch, draw up a lp in 2nd bump from hook, draw up a lp in each of the rem bumps, first half of row completed. (244 lps on hook)For return, yo, draw through first 3 lps on hook, *[yo, draw through 2 lps] 9 times, ch 3, [yo, draw through 2 lps] 9 times, yo, draw through 5 lps, rep from * across, ending yo, draw through 4 lps, rem lp counts as first st of next row.

Row 2: Retaining all lps on hook, ch 1, sk first cl, *pick up lp under next vertical bar, [yo, sk next vertical bar, pick up lp under next vertical bar] 4 times, yo, sk next ch, [pick up a lp in next ch] twice, yo, pick up lp under next vertical bar, [yo, sk next vertical bar, pick up lp under next vertical bar] 4 times, sk cl, rep from *, ending with pick up lp in top of final cl. For return, work as for Row 1.

Row 3: Pick up lps as for Row 2 noting that the vertical bars you will be skipping in fact look more diagonal than vertical, fasten off color. For return, place white on hook with sl knot, draw sl knot through first 3 lps on hook, work as for Row 1 from *.

Row 4: Pick up lps as for Row 3, drop white at end of row, but do not fasten off, instead carry along side edge, twisting to avoid holes. For return, place next scrap color on hook and continue as for Row 3.

Row 5: Rep Row 2.

Row 6: Rep Row 3 to pick up lps. For return, pick up white and work as for Row 1.

Row 7: Rep Row 4.

Row 8: Rep Row 6.

Row 9: Rep Row 4.

Row 10: Rep Row 2.

Rows 11-86: Rep Rows 2-10, noting that since you are carrying the white along the side edge the return portion of Row 3 will now be the same as the return for Row 6.

Row 87: Rep Row 2.


After completing the return portion of Row 87, bind off in the following manner, ch 1, sk first cl, *[pick up lp under next vertical bar and draw through lp already on hook] 9 times, [pick up lp in next ch and draw through lp already on hook] 4 times, [pick up lp under next vertical bar and draw through lp already on hook] 9 times, sk cl, rep from * across, ending with pick up lp in top of final cl and draw through lp on hook, fasten off.

Saturday, March 28, 2009

FREE Pattern of the Day » Spring Green Purse » Crochet


Bright, beaded flowers on a spring-green bag add a fanciful splash of color to your warm weather wardrobe.


Skill Level

Intermediate


Finished size

10 x 11 inches, excluding handles


Materials


Elmore-Pisgah Peaches & Creme medium (worsted) weight cotton yarn:
5 oz/250 yds/142g #51 apple green
2 oz/100 yds/57g each #33 persimmon, #53 verde green, #19 peacock,

#41 light grape and #165 daisy ombre


Size G/6/4mm crochet hook or size needed to obtain gauge
Tapestry needle
Sewing needle
White sewing thread
1 yd white lining fabric
7-count plastic canvas: 14 x 179 holes
2-inch hook-and-loop fastener
5mm pearl beads: 37
Purse handles
Gauge3 sts = 1 inch; 2 rows = 1 inch
Purse


Side

Make 2.

Row 1: Beg at top edge, with apple green, ch 26, dc in 4th ch from hook (first 3 chs count as first dc), dc in each ch across, turn. (24 dc)

Row:2-4: Ch 3 (counts as first dc), dc in each st across, turn.

Row 5: Ch 3, dc in same st, 2 dc in next st, [dc in next st, 2 dc in next st] across turn. (36 dc)Rows 6-19: Rep row 2.

Row 20: Ch 2, dc dec in next 2 sts, dc in each st across to last 3 sts, dc dec in last 3 sts. Fasten off. (33 dc)


Gusset

Row 1: With apple green, ch 11, dc in 4th ch from hook and in each ch across, turn. (9 dc)

Rows 2-41: Ch 3, dc in each st across, turn. At end of last row, fasten off.


Small FlowerMake 3.


Center Rnd 1: With yellow variegated, leaving 6-inch end, make slip-knot ring (see Fig. 1), ch 2 (counts as first hdc), 9 hdc in slip-knot ring, join with sl st in 2nd ch of beg ch-2, pull to close ring. (10 hdc)

Rnd 2: Ch 2, hdc in each st around, join with sl st in 2nd ch of beg ch-2. Fasten off.

PattleRow 1: With light violet, make slip-knot ring, ch 3, 9 dc in ring, join with sl st in 3rd ch of beg ch-3, pull to close ring. (10 dc)

Rnd 2: [Ch 3, sl st in next st] around, join with sl st in 3rd ch of beg ch-3. Fasten off.Sew 1 Center to center of each Petal.


Bluebell

Make 3.

Rnd 1: With blue, leaving 6-inch end, make slip-knot ring, ch 2, 9 hdc in ring, join with sl st in 2nd ch of beg ch-2, pull end to close ring. (10 hdc)

Row2: Ch 2, hdc in each st around, join with sl st in 2nd ch of beg ch-2.

Rnd 3: Ch 3, [sl st in next st, ch 3] around, join with sl st in base of beg ch-3. Fasten off.


Rose

Row1: With persimmon, make slip-knot ring, ch 3, 11 dc in ring, join with sl st in 3rd ch of beg ch-3. (12 dc)

Rnd 2: [Ch 4, sk next st, sc in next st] around, join with sl st in base of beg ch-4.

Rnd 3: Ch 1, (sc, hdc, 3 dc, hdc, sc) in first ch sp and in each ch sp around, join with sl st in beg sc. (6 petals)

Rnd 4: Working behind petals, [ch 5, sl st in sp between next 2 sc] around, join with sl st in base of beg ch-5.Rnd 5: Ch 1, (sc, hdc, 4 dc, hdc, sc) in first ch sp and in each ch sp around, join with sl st in beg sc. Fasten off.


LeafMake 3.

With green, ch 15, sc in 2nd ch from hook, sc in next ch, hdc in each of next 2 chs, dc in each of next 5 chs, hdc in each of next 2 chs, sc in each of next 2 chs, sl st in last ch, working on opposite side of ch, sc in each of next 2 chs, hdc in each of next 2 chs, dc in each of next 5 chs, hdc in each of next 2 chs, sc in each of next 2 chs, sl st in turning ch. Fasten off.


Lining1.

Using 1 Side piece as pattern piece, cut 2 pieces from fabric 1/4 inch larger on all sides beg at row 5 and around bottom.2. Using Gusset piece as pattern, cut 1 piece from fabric 1/4 inch larger around all edges.3. Using sewing thread and sewing needle, with RS tog, allowing 1/4 inch for seam, sew 1 long edge of gusset piece around sides and bottom edge of 1 side piece. Sew rem long edge of gusset to rem side piece.


Assembly

1. Beg at row 7, sew 1 long edge of Gusset around sides and bottom edge of 1 Side. Sew rem long edge of Gusset to rem

Side piece.

2. Tack short ends of plastic canvas to top edges of Gusset.

3. With tapestry needle and matching yarn, sew Flowers and Leaves on 1 Side as shown in photo or as desired.

4. Use sewing needle and thread through

6. Sew 1 bead to Center of each Small Flower.

5. For stamens, [thread 3 beads on sewing thread, sew to center of 1 Bluebell] 3 times; rep on rem Bluebells.

6. Sew 1 bead in center of Rose, sew 6 beads in circle around first bead.

7. Working across 1 end on Sides and top edge of Gusset, working from left to right, join apple green with sc in end of row 3 on Side, evenly sp reverse sc (see Fig. 2) across to row 3 on other Side of Purse. Fasten off.Rep on rem end of Purse.

8. Fold rows 1 and 2 of Purse to inside and tack in place.

9. Place Lining inside Purse. Folding top edge of Lining over 1/4 inch, sew in place with sewing needle and thread.

10. With tapestry needle and apple green, sew 1 handle to inside of row 2 on each Side.11. Attach hook-and-loop fastener to inside at top of Lining.
Copyright © 2007. Crochet!, May 2007. Pages 2 & 3. All rights reserved.

Thursday, March 26, 2009

FREE Pattern of the Day » Pot Holder Pizzazz » Crochet


Skill Level

Easy
Finished Size6 1/4 inches


150 yds natural
75 yds black
30 yds each cardinal and forest green


Size 1/2.25mm steel crochet hook or size needed to obtain gauge
Tapestry needle
1-inch plastic ring


Gauge

Rnds 1 and 2 of Back = 2 inches in diameter; 3 dc = 1/2 inch
Pattern NotesWeave in loose ends as work progresses.Join rounds with a slip stitch unless otherwise stated.Work with 2 strands of cotton held together throughout.
Hanging LoopAttach 2 strands of forest green to plastic ring, ch 1, 24 sc over ring, join in first sc, fasten off. Set aside.


FrontRose

Rnd 1 (RS): Working with 2 strands of cardinal held tog, ch 5, sl st to join in first ch to form a ring, ch 3 (counts as first dc), 9 dc in ring, join in 3rd ch of beg ch-3. (10 dc)

Rnd 2: Ch 1, sc in each dc around, join in beg sc.

Rnd 3: Ch 2, (2 dc, ch 2, sl st) in same st as beg ch-2, sk next sc, *(sl st, ch 2, 2 dc, ch 2, sl st) in next sc, sk next sc, rep from * around, do not join. (5 petals)

Rnd 4: Ch 3, [sc in back lp only of rem sk sc of rnd 2, ch 3] around, to join sl st in first ch of beg ch-3. (5 lps)

Rnd 5: Sl st into ch-3 sp, (ch 2, 4 dc, ch 2, sl st) in same ch-3 sp, *(sl st, ch 2, 4 dc, ch 2, sl st) in next ch-3 sp, rep from * around, do not join. (5 petals)

6: Working at back of petals between dc sts of previous rnd, ch 1, insert hook at center between 4-dc of petal and sc over ch-3 sp, ch 5, [insert hook at center between 4 dc of next petal and sc over ch-3 sp, ch 5] around, ending with sl st in first ch of ch-5 of first lp. (5 ch-5 lps)

Rnd 7: Sl st into ch-5 sp, (ch 2, 6 dc, ch 2, sl st) in same ch sp, *(sl st, ch 2, 6 dc, ch 2, sl st) in next ch-5 sp, rep from * around, do not join. (5 petals)

Rnd 8: Working at back of petals between dc sts of previous rnd, ch 2, insert hook at center between 6-dc of petal and sc over ch-5 sp, ch 5, [insert hook at center between 6-dc of petal and sc over ch-5 sp, ch 5] around, ending with sl st in first ch of ch-5, fasten off.

Rnd 9: Attach 2 strands of forest green in any ch-5 sp, ch 3, 7 dc in same ch-5 sp, 8 dc in each of next 4 ch-5 sps, join in 3rd ch of beg ch-3, fasten off. (40 dc)

Rnd 10: Attach 2 strands of black in 3rd ch of beg ch-3 of previous rnd, ch 7 (counts as first dc, ch 4), dc in same st as beg ch-7, sk next 3 dc, [(dc, ch 4, dc) in next dc, sk next 3 dc] around, join in 3rd ch of beg ch-7. (10 ch-4 sps, 20 dc)

Rnd 11: Sl st into ch-4 sp, ch 1, 7 sc in same ch-4 sp, sl st between next 2 dc, [7 sc in next ch-4 sp, sl st between next 2 dc] around, join in beg sc, fasten off.

Rnd 12: Attach 2 strands of natural in 4th sc of 7-sc group, ch 1, sc in same sc, ch 3, dc in 3rd dc on rnd 9, ch 3, *sc in 4th sc of next 7-sc group of rnd 11, ch 3, sk next 3 dc of rnd 9, dc in next dc, ch 3, rep from * around, join in beg sc. (10 dc, 10 sc, 20 ch-3 sps)

Rnd 13: Sl st in next ch, ch 3, 2 dc in next ch, dc in next ch, sk next dc, dc in next ch, 2 dc in next ch, dc in next ch, sk next sc, *dc in next ch, 2 dc in next ch, dc in next ch, sk next dc, dc in next ch, 2 dc in next ch, dc in next ch, sk next sc, rep from * around, join in 3rd ch of beg ch-3. (80 dc)

Rnd 14: Ch 3, dc in each of next 3 dc, 2 dc in next dc, [dc in each of next 4 dc, 2 dc in next dc] around, join in 3rd ch of beg ch-3, fasten off. (96 dc)


Back

Rnd 1 (RS): With 2 strands of natural held tog, ch 5, sl st to join in first ch to form a ring, ch 3, 19 dc in ring, join in 3rd ch of beg ch-3. (20 dc)

Rnd 2: Ch 3, dc in same dc as beg ch-3, 2 dc in each rem dc around, join in 3rd ch of beg ch-3. (40 dc)

Rnd 3: Ch 4 (counts as first tr), 2 tr in next dc, [tr in next dc, 2 tr in next dc] around, join in 4th ch of beg ch-4. (60 tr)

Rnd 4: Ch 3, dc in next tr, 2 dc in next tr, [dc in each of next 2 tr, 2 dc in next tr] around, join in 3rd ch of beg ch-3. (80 dc)

Rnd 5: Ch 3, dc in each of next 3 dc, 2 dc in next dc, [dc in each of next 4 dc, 2 dc in next dc] around, join in 3rd ch of beg ch-3, fasten off. (96 dc)


Joining

Rnd 1: Holding Front and Back with WS tog and Front facing, working through both thicknesses, attach 2 strands of black in first dc of previous rnd, ch 7, dc in same st as beg ch-7, sk next 3 dc, *(dc, ch 3, dc) in next dc, sk next 3 dc, rep from * around, join in 3rd ch of beg ch-7.

Rnd2: Sl st into ch-4 sp, ch 1, 7 sc in same ch-4 sp as beg ch-1, sl st between next 2 dc, pick up hanging lp, sl st in first sc on plastic ring, [ch 1, sc in next sc] rep around hanging lp, sl st in top of last sl st, [7 sc in next ch-4 sp, sl st between next 2 dc] around, join in beg sc, fasten off.


Skill LevelEasy


Finished Size6 1/2 inches
Materials
Size 10 crochet cotton:
75 yds white
25 yds blue
15 yds red
Size 7/1.65mm steel crochet hook or size needed to obtain gauge
Tapestry needle
Gauge


Rnds 1-6 of rose = 2 inches; 8 dc = 1 inch


Pattern NotesWeave in loose ends as work progresses.Join rounds with a slip stitch unless otherwise stated.
Front


Rnd 1 (RS): With red, ch 5, sl st in first ch to form a ring, ch 6 (counts as first dc and ch-3), [dc in ring, ch 3] 5 times, join in 3rd ch of beg ch-6. (6 ch-3 sps)


Rnd 2: Ch 1, sc in same st as beg ch-1, (sc, hdc, dc, hdc, sc) in next ch sp, *sc in next dc, (sc, hdc, dc, hdc, sc) in next ch sp, rep from * around, join in beg sc. (6 petals)


3: Working behind petals, ch 4, [sl st in next sc between petals, ch 4] around, join with sl st in same sc as first ch-4. (6 ch-4 sps)


Rnd 4: Ch 1, sc in same st as beg ch 1, *(sc, hdc, 3 dc, hdc, sc) in next ch sp**, sc in next st between ch sps, rep from * around, ending last rep at **, join in beg sc.


Rnd 5: Working behind petals, ch 6, [sl st in next sc between petals, ch 6] around, join with sl st in same st as beg ch-6


.Rnd 6: Ch 1, sc in same st as beg ch-1, *(sc, hdc, 2 dc, 2 tr, 2 dc, hdc, sc) in next ch sp**, sc in st between ch sps, rep from * around, ending last rep at **, join in beg sc.


Rnd 7: Working behind petals, ch 8, [sl st in next sc between petals, ch 8] around, ending with sl st in same st as beg ch-8, fasten off. (6 ch-8 sps)


Rnd 8: Attach white with a sl st in any ch-8 sp, ch 3 (counts as first dc throughout), 7 dc in same ch sp, ch 2, [8 dc in next ch sp, ch 2] around, change color to blue, join in 3rd ch of beg ch-3.


Rnd 9: (Ch 3, dc) in first st, dc in each dc across to st before next ch-2 sp, 2 dc in next st, ch 2, [2 dc in next st, dc in each st across to st before next ch-2 sp, 2 dc in next st, ch 2] around, change color to white in last ch, join in 3rd ch of beg ch-3.


Rnd 10: (Ch 3, dc) in first st, dc in each st across to st before next ch-2 sp, 2 dc in next st, ch 2, [2 dc in next st, dc in each st across to st before next ch-2 sp, 2 dc in next st, ch 2] around, change color to blue in last ch, join in 3rd ch of beg ch-3.


Rnds 11-14: Rep rnds 9 and 10.Rnd 15: Rep rnd 9, fasten off. (22 dc between each ch-2 sp)


back


rnd1: With white, ch 6, sl st in first st to form ring, ch 3, dc in ring, ch 2, [2 dc in ring, ch 2] 5 times, join in 3rd ch of beg ch-3. (12 dc, 6 ch-2 sps)


2: (Ch 3, dc) in first dc, 2 dc in next dc, ch 2, [2 dc in each of next 2 dc, ch 2] around, join in 3rd ch of beg ch-3.


Rnd 3: (Ch 3, dc) in first dc, dc in each of next 2 dc, 2 dc in next dc, ch 2, [2 dc in next dc, dc in each of next 2 dc, 2 dc in next dc, ch 2] around, join in 3rd ch of beg ch-3.


Rnds 4-9: (Ch 3, dc) in first dc, dc in each dc across to st before next ch-2 sp, 2 dc in next dc, ch 2, [2 dc in next dc, dc in each st across to st before next ch-2 sp, 2 dc in next st, ch 2] around, join in 3rd ch of beg ch-3.


Rnd 10: (Ch 3, dc) in first dc, dc in each st across to st before next ch-2 sp, 2 dc in next st, ch 3, [2 dc in next dc, dc in each dc across to st before ch-2 sp, 2 dc in next dc, ch 3] around, join in 3rd ch of beg ch-3.


Rnd 11: (Ch 3, dc) in first dc, dc in each dc across to st before next ch-3 sp, 2 dc in next dc, ch 3, [2 dc in next dc, dc in each dc across to st before next ch-3 sp, 2 dc in next dc, ch 3] around, join in 3rd ch of beg ch-3, fasten off. (6 ch-3 sp, 22 dc between each ch sp)


Joining & turnning


12: Holding Front and Back WS tog with Front facing, matching sts and working through both thicknesses, attach white with sc in any st, sc in each st around with 3 sc in each ch-3 sp around, join in beg sc, fasten off.Rnd 13: Attach red with sc in center st of any 3-sc group, ch 18 (hanging lp), sc in next st, ch 2, sk next 2 sts, 4 dc in next st, [ch 2, sk next 2 sts, sc in next st, ch 2, sk next 2 sts, 4 dc in next st] 3 times, ch 2, *sc in center st of next 3-sc group, ch 3, sc in next st, ch 2, sk next 2 sts, 4 dc in next st, [ch 2, sk next 2 sts, sc in next st, ch 2, sk next 2 sts, 4 dc in next st] 3 times, ch 2, rep from * around, join in beg sc, work 18 sc over ch-18 hanging lp, sl st in next sc, fasten off.


Skill Level

Easy
Finished Size7 inches
Materials


Grandma's Best size 10 crochet cotton:
60 yds #11 light blue
50 yds #162 light yellow
Size 7/1.65mm steel crochet hook or size needed to obtain gauge
Tapestry needle
Gauge

Rnds 1-3 = 1 1/2 inches; 10 dc = 1 inch
Pattern NotesWeave in loose ends as work progresses.Join rounds with a slip stitch unless otherwise stated.

Stitches3-double crochet cluster (3-dc cl): [Yo, insert hook in next st, yo, draw up a lp, yo, draw through 2 lps on hook] 3 times, yo, draw through all 4 lps on hook.Beginning 3-double crochet cluster (beg 3-dc cl): Ch 2, [yo, insert hook in next st, yo, draw up a lp, yo, draw through 2 lps on hook] twice, yo, draw through all 3 lps on hook.


Back

Rnd 1 (RS): With light blue, ch 7, sl st to join in first ch to form a ring, ch 3 (counts as first dc throughout), 20 dc in ring, join in 3rd ch of beg ch-3. (21 dc)

Rnd 2: Ch 3, dc in same dc as beg ch-3, dc in each of next 2 dc, [2 dc in next dc, dc in each of next 2 dc] around, join in 3rd ch of beg ch-3. (28 dc)

Rnd 3: Ch 3, dc in same dc as beg ch-3, dc in next dc, [2 dc in next dc, dc in next dc] around, join in 3rd ch of beg ch-3. (42 dc)

Rnd 4: Ch 3, dc in same dc as beg ch-3, dc in each of next 2 dc, [2 dc in next dc, dc in each of next 2 dc] around, join in 3rd ch of beg ch-3. (56 dc)

Rnd 5: Ch 3, dc in same dc as beg ch-3, dc in each of next 3 dc, [2 dc in next dc, dc in each of next 3 dc] around, join in 3rd ch of beg ch-3. (70 dc)

Rnd 6: Ch 3, dc in same dc as beg ch-3, dc in each of next 4 dc, [2 dc in next dc, dc in each of next 4 dc] around, join in 3rd ch of beg ch-3. (84 dc)

Rnd 7: Ch 3, dc in same dc as beg ch-3, dc in each of next 5 dc, [2 dc in next dc, dc in each of next 5 dc] around, join in 3rd ch of beg ch-3. (98 dc)

Rnd 8: Ch 3, dc in same dc as beg ch-3, dc in each of next 6 dc, [2 dc in next dc, dc in each of next 6 dc] around, join in 3rd ch of beg ch-3. (112 dc)

Rnd 9: Ch 3, dc in same dc as beg ch-3, dc in each of next 7 dc, [2 dc in next dc, dc in each of next 7 dc] around, join in 3rd ch of beg ch-3. (126 dc)

Rnd 10: Ch 3, dc in same dc as beg ch-3, dc in each of next 8 dc, [2 dc in next dc, dc in each of next 8 dc] around, join in 3rd ch of beg ch-3. (140 dc)

Rnd 11: Ch 3, dc in same dc as beg ch-3, dc in each of next 9 dc, [2 dc in next dc, dc in each of next 9 dc] around, join in 3rd ch of beg ch-3. (154 dc)

12: Ch 3, dc in same dc as beg ch-3, dc in each of next 10 dc, [2 dc in next dc, dc in each of next 10 dc] around, join in 3rd ch of beg ch-3, fasten off. (168 dc)


Front

Rnd1 (RS): With light yellow, ch 7, sl st to join in first ch to form a ring, ch 3, 20 dc in ring, join in 3rd ch of beg ch-3. (21 dc)

rnd2: Ch 3, dc in each of next 2 dc, ch 2, [dc in each of next 3 dc, ch 2] around, join in 3rd ch of beg ch-3. (7 groups 3-dc, 7 ch-2 sps)

Rnd 3: Ch 3, dc in same dc as beg ch-3, dc in next dc, 2 dc in next dc, ch 2, sk next ch-2 sp, *2 dc in next dc, dc in next dc, 2 dc in next dc, ch 2, sk next ch-2 sp, rep from * around, join in 3rd ch of beg ch-3. (7 groups 5-dc, 7 ch-2 sps)

Rnd 4: Sl st in next dc, beg 3-dc cl (see Special Stitches) in next 2 dc, *ch 3, sk next dc, 3 dc in next ch-2 sp, ch 3**, sk next dc, 3-dc cl (see Special Stitches) in next 3 dc, rep from * around, ending last rep at **, join in top of beg 3-dc cl. (7 cls, 7 groups 3-dc, 14 ch-3 sps)

Rnd 5: Sl st into ch-3 sp, ch 3, 3 dc in same ch-3 sp, *ch 1, sk next 3 dc, 4 dc in next ch-3 sp, ch 1, sk next 3-dc cl**, 4 dc in next ch-3 sp, rep from * around, ending last rep at **, join in 3rd ch of beg ch-3.

Rnd 6: Sl st in each of next 3 dc, sl st into next ch-1 sp, ch 3, 2 dc in same ch-1 sp, *ch 5, sk next 4 dc, sc in next ch-1 sp, ch 5, sk next 4 dc**, 3 dc in next ch-1 sp, rep from * around, ending last rep at **, join in 3rd ch of beg ch-3. (21 dc, 7 sc, 14 ch-5 sps)

Rnd 7: Ch 3, dc in same dc as beg ch-3, dc in next dc, 2 dc in next dc, *ch 2, 2 dc in next ch-5 sp, ch 1, 2 dc in next ch-5 sp, ch 2**, 2 dc in next dc, dc in next dc, 2 dc in next dc, rep from * around, ending last rep at **, join in 3rd ch of beg ch-3. (63 dc)

Rnd 8: Ch 3, dc in same dc as beg ch-3, *dc in each of next 3 dc, 2 dc in next dc, ch 3, sk next ch-2 sp, 3 dc in next ch-1 sp, ch 3, sk next ch-2 sp**, 2 dc in next dc, rep from * around, ending last rep at **, join in 3rd ch of beg ch-3. (70 dc)

Rnd 9: Sl st in next dc, ch 3, dc in each of next 4 dc, *ch 4, sk next dc, sk next dc, sk next ch-3 sp, 2 dc in next dc, dc in next dc, 2 dc in next dc, ch 4, sk next ch-3 sp, sk next dc**, dc in each of next 5 dc, rep from * around, ending last rep at **, join in 3rd ch of beg ch-3.

Rnd 10: Sl st in next dc, beg 3-dc cl in next 3 sts, *ch 9, sk next ch-4 sp, sk next dc**, 3-dc cl over next 3 dc, rep from * around, ending last rep at **, join in beg 3-dc cl. (14 cls)

Rnd 11: Sl st into ch-9 sp, ch 3, 9 dc in same ch sp, ch 1, sk next 3-dc cl, [10 dc in next ch-9 sp, ch 1, sk next 3-dc cl] around, join in 3rd ch of beg ch-3. (140 dc)

Rnd 12: Ch 1, sc in same dc as beg ch-1, sc in each of next 9 dc, ch 2, sk next ch-1 sp, [sc in each of next 10 dc, ch 2, sk next ch-1 sp] around, join in beg sc.Rnd 13: Ch 3, dc in each of next 9 sc, 2 dc in next ch-2 sp, [dc in each of next 10 sc, 2 dc in next ch-2 sp] around, join in 3rd ch of beg ch-3. (168 dc)


Joining

Rnd 14: Holding WS of Front and Back tog, with Front facing and working through both thicknesses, ch 1, sc in each st around, join in beg sc, fasten off.
EdgingRnd 1: With Front facing, attach light blue in any sc, ch 3, dc in each of next 3 sc, *ch 2, sk next sc, dc in next sc, ch 2, sk next sc**, dc in each of next 4 sc, rep from * around, ending last rep at **, join in 3rd ch of beg ch-3.Rnd 2: Sl st in next dc, ch 1, sc in same dc, *ch 3, sc in next dc, ch 2, sk next dc, 3-dc cl in next ch-2 sp, ch 5, sl st in 4th ch from hook, ch 1, 3-dc cl in next ch-2 sp, ch 2, sk next dc**, sc in next dc, rep from * around, ending last rep at **, join in beg sc, fasten off.


Tuesday, March 3, 2009

FREE Pattern of the Day » Lacy Crib Quilt » Crochet


If you've been looking for an extra-special gift idea for the extra-special wee one in your life, then look no further than this dainty and delicate design by Margaret Kremer of California. It's a pattern guaranteed to please!
Finished Size46" x 57".
Materials
Red Heart® Baby Pompadour Art. E255 by Coats & Clark or pompadour baby yarn:
20 oz. White #1
6 oz. Lt. Pink #722
6 oz. Baby Blue #802
6 oz. Baby Yellow #224
4 oz. Pastel Green #680
Tapestry needle
E and F hooks or hook needed to obtain gauge
Click here for the Assembly Illustration (PDF format)
GaugeE hook, 5 sts = 1". Each Motif is 5 1/2" square.
Basic StitchesCh, sl st, sc, hdc.
Special StitchesFor extended dc (edc), yo, insert hook in next st or ch sp, yo, pull lp through, yo, pull through 1 lp on hook, (yo, pull through 2 lps on hook) 2 times.For extended hdc (ehdc), yo, insert hook in ch sp, yo, pull lp through, yo, pull through 1 lp on hook, yo, pull through all 3 lps on hook.For V st, (ehdc, 1-sc picot, ehdc) around ch sps of last 2 rnds at same time.For 1-sc picot, ch 2, sc in back bar (see illustration) of second ch from hook, ch 1.For 2-sc picot, ch 2, 2 sc in back bar of second ch from hook.For 3-sc picot, ch 1, 3 sc in back bar of ch.For 4-sc picot, ch 1 loosely, 4 sc in back bar of ch.For ch-3 picot, ch 3, sc in back bar of third chain.For joined ch-3 sp, ch 1, sl st in center ch of corresponding ch-3 sp on other Motif, ch 1.
First MotifNote: Do not join rnds unless otherwise stated. Mark first st of each rnd.Rnd 1: For first section, with E hook and color indicated on Assembly Illustration, ch 2, 8 sc in second ch from hook. (8 sc made)Rnd 2: 2 sc in each st around. (16)Rnd 3: (Sc in next st, 2 sc in next st) around. (24)Rnd 4: Sc in first st, (ch 4, skip next st, sc in next 5 sts) 3 times, ch 4, skip next st, sc in last 4 sts, join with sl st in first sc.Rnd 5: Ch 3, (2 edc -- see Special Stitches, 1-sc picot, 2 edc) in next ch sp, *edc in next 5 sts, (2 edc, 1-sc picot, 2 edc) in next corner ch sp; repeat from * 2 more times, edc in last 4 sts, join with sl st in top of ch-3. Fasten off.Rnd 6: For second section, working from back to front, join color indicated with sl st around post of first st, ch 3, edc fp around next st, edc bp around next st, *(2 edc, ch 1, 2-sc picot -- see Special Stitches, ch 1, 2 edc) in next corner ch sp, *edc bp around next st, (edc fp around next st, edc bp around next st) 4 times, (2 edc, ch 1, 2-sc picot, ch 1, 2 edc) in next corner ch sp; repeat from * 2 more times, (edc bp around next st, edc fp around next st) 3 times, join.Rnd 7: Ch 1, working from back to front, sl st around post of first st, ch 3, (edc fp around next st, edc bp around next st) 2 times; working in next corner ch sp, 2 edc before next picot, ch 1, 2-sc picot, ch 1, 2 edc after picot, *edc bp around next st, (edc fp around next st, edc bp around next st) 6 times; working in next corner ch sp, 2 edc before next picot, ch 1, 2-sc picot, ch 1, 2 edc after picot; repeat from * 2 more times, (edc bp around next st, edc fp around next st) 4 times, join. Fasten off.Rnd 8: For third section, working this rnd in back lps only, join color indicated with sc in any st, sc in each st around with (2 sc in first corner ch, 4-sc picot -- see Special Stitches, 2 sc in second corner ch) at each corner, join with sl st in first sc. Fasten off.Rnd 9: For fourth section, working this rnd in back lps, join color indicated with sc in any st, *sc in each st around to next 4-sc picot, ch 1, 2-sc picot, ch 1, skip next 4-sc picot; repeat from * 3 more times, sc in each st around, join, turn. Fasten off. (20 sc across each side between corner picots)Rnd 10: Join white with sl st in front lp of second sc on any corner picot, *[ch 3, sc in next st, (ch 3, skip next 2 sts, sc in next 2 sts) 4 times, ch 3, skip next 2 sts, sc in next st, ch 3], sl st in front lp of second sc on next corner picot; repeat from * 2 more times; repeat between [ ], join. Fasten off.
One-Side Joined MotifRnds 1-9: Work rnds 1-9 of First Motif.Rnd 10: Join white with sl st in front lp of second sc on any corner picot, ch 3, sc in next st; joining to side of last Motif, (work joined ch-3 sp -- see Special Stitches, skip next 2 sts on this Motif, sc in next 2 sts) 4 times, work joined ch-3 sp, skip next 2 sts on this Motif, sc in next st, *ch 3, sl st in front lp of second sc on next corner picot, ch 3, sc in next st, (ch 3, skip next 2 sts, sc in next 2 sts) 4 times, ch 3, skip next 2 sts, sc in next st; repeat from * 2 more times, ch 3, join. Fasten off.
Two-Side Joined MotifRnds 1-9: Work rnds 1-9 of First Motif.Rnd 10: Join white with sl st in front lp of second sc on any corner picot, ch 3, sc in next st; joining to bottom of corresponding Motif, *(work joined ch-3 sp, skip next 2 sts on this Motif, sc in next 2 sts) 4 times, work joined ch-3 sp, skip next 2 sts on this Motif, sc in next st, ch 3, sl st in front lp of second sc on next corner picot, ch 3, sc in next st*; joining to side of last Motif; repeat between first and second *, (ch 3, skip next 2 sts, sc in next 2 sts) 4 times, ch 3, skip next 2 sts, sc in next st, ch 3, sl st in front lp of second sc on next corner picot, ch 3, sc in next st, (ch 3, skip next 2 sts, sc in next 2 sts) 4 times, ch 3, skip next 2 sts, sc in next st, ch 3, join. Fasten off.
Motif AssemblyWork and join Motifs according to Assembly Illustration, working section colors as indicated.
Filler FlowerRnd 1: With right side facing you, working in space between Motifs, with F hook and color indicated on Assembly Illustration, join with sl st in sc before first corner ch-3 sp on one Motif, *[3 sc in next ch-3 sp, (sc, 3-sc picot -- see Special Stitches, sc) in next sl st between corner ch-3 sps, 3 sc in next corner ch-3 sp, sl st in next sc, ch 2], sl st in next st before next corner ch-3 sp on next Motif; repeat from * 2 more times; repeat between [ ], skip next sl st, join with sl st in back lp of first sc.Rnd 2: Working this rnd in back lps only, sl st in next 2 sts, *[ch 7, skip next picot, sl st in next 3 sc, ch 2], sl st in next 3 sc; repeat from * 2 more times; repeat between [ ], join. Fasten off.Catching center ch of each ch-7 as you work, weave matching strand yarn through end sc of each picot on rnd 1; pull to gather tightly, secure end.Repeat Filler Flower in each space between Motifs with colors indicated on Assembly Illustration.
BorderNote: Work remaining rnds in back lps only.Rnd 1: With right side facing you, using E hook, join green with sc in first ch-3 sp of any corner, 2 sc in same sp, [ch 5, 3 sc in next corner ch-3 sp, *sc in next st, (ch 3, sc in next 2 sts) 4 times, ch 3, sc in next st, 3 sc in next ch sp, ch 2, sc in first ch of next ch-3, skip next joining, sc in last ch of next ch-3, ch 2, 3 sc in next ch sp; repeat from * across to last Motif before next corner; sc in next st, (ch 3, sc in next 2 sts) 4 times, ch 3, sc in next st, 3 sc in next corner ch sp]; repeat between [ ] 2 more times; repeat between first and second, join with sl st in first sc. Fasten off.Rnd 2: Join white with sc in center ch of corner ch-5 sp on one short side; working across short side, 2 sc in same ch, sc in next 2 chs, sc in next 4 sts, *(ch 3, skip next 3 sts, sc in next 2 sts) 5 times, ch 3, skip next 2 sts, 2 hdc in next ch-2 sp, ch 3, skip seam, 2 hdc in next ch-2 sp, ch 3, skip next 2 sts, sc in next 2 sts*; repeat from * 8 more times, (ch 3, skip next 3 sts, sc in next 2 sts) 4 times, ch 3, skip next 3 sts, sc in next 6 sts; working across long side, 3 sc in next st (corner made), sc in next 6 sts; repeat between first and second * 6 times; repeat between first and second;For last 2 sides of this rnd, repeat from first *, join with sl st in first sc. Fasten off.Rnd 3: Join green with sc in any center corner st, sc in same st, *(ch 3, skip next 2 sts, sc in next st, ch 3, skip next 2 sts, sc in next 2 sts, (ch 3, skip next ch sp, sc in next 2 sts) across to last ch-3 sp, ch 3, skip next ch sp, sc in next 2 sts, ch 3, skip next 2 sts, sc in next st, ch 3, skip next 2 sts*, 2 sc in corner st; repeat from * 2 more times; repeat between first and second *, join with sl st in first sc. Fasten off.Rnd 4: Join white with sl st in first sc of any 2-sc corner group, 2-sc picot, sl st in same st, (sl st, 2-sc picot, sl st) in next st; working around entire outer edge of Afghan, sc in each ch and in each st, V st (see Special Stitches) worked over each ch-3 sp around with (sl st, 2-sc picot, sl st) in next ch, (sl st, 2-sc picot, sl st) in next ch in each corner ch-2 sp, join.Rnd 5: Join green with sc in first sc past any corner picot group, sc in next 3 sts, *2-sc picot, ch 2, skip next 3 sts, sl st in next st, (2-sc picot, ch 2, skip next V st, sl st in next st) across to last V st, 2-sc picot, ch 2, skip next V st, sl st in next st, 2-sc picot, ch 2, skip next 3 sts, sc in next 3 sts; for corner, ch-3 picot, ch 1, skip next picot, sl st in next sl st, 2-sc picot, ch 2, skip next picot*, sc in next 3 sts; repeat from * 2 more times; repeat between first and second *, join. Fasten off.


Friday, January 30, 2009

Vintage Crochet Pineapple Doily

Material to use

Crochet thread size 10
Hook 1.75 mm

Pattern from http://www.coatsandclark.com/NR/rdonlyres/CC3EC2BE-34EB-4C6B-8931-DB4D66C66822/100789/WC1718.pdf

Pinwheel Treat


My materials
Crochet cotton size 10
Hook size 1.75mm
Gauge 13 inches in diameter
Its design by Della Bieber. I am find this pattern from http://www.freepatterns.com/search.html?criteria=pinwheel+treat&mode=list&x=15&y=8

Tuesday, January 20, 2009

Rose Runner (Today free patterns)


Pattern Notes
Runner is crocheted from center outward.After completing a few rows, attach safety pin to left edge and mark your chart with pencil on the left edge. This way you will always remember in which direction you are working as you work according to chart.

Special Stitches
Beginning block (beg block): Ch 3 (counts as first dc), dc in each of next 3 sts.
Block: Dc in each of next 3 sts, or, 2 dc in next ch sp, dc in next st.
Mesh: Ch 2, sk next 2 sts, dc in next st, or, ch 2, sk next ch sp, dc in next st.

Instructions

Runner

First Half
Row 1 (RS): Ch 213, dc in 4th ch from hook, dc in each of next 2 chs, [ch 2, sk next 2 chs, dc in next ch] 68 times, dc in each of last 3 chs, turn.(2 blocks, 68 mesh)
Row 2: Beg block (see Special Stitches), 68 mesh (see Special Stitches), block (see Special Stitches), turn.
Rows 3-100: Using Special Stitches as needed, work according to Rose Runner Chart, turn. At end of last row, fasten off.

2nd Half
Row 1 (RS): Make sure the RS of row 1 of first half is facing, join with sl st in first ch, ch 3, dc in each of next 3 chs, 68 mesh, block, turn.
Rows 2-100: Rep rows 2-100 of First Half.Starch and press.

http://www.anniesattic.com/free_pattern_day/images/20080120.pdf

Monday, January 19, 2009

Lacy Ice Crystal

I am using Thread
Size 10 crochet cotton
Size 1.75 steel crochet hook
Its Designed by Julie A. Bolduc

Monday, November 17, 2008

Monday, October 13, 2008

Hook Size Conversion Chart


Crochet Hook have different names, just like clover, Boye (U.S), U.K hook . Crochet patterns books show a different name of hook, I convert my hooks to mm to understand easier. I hope u will get the help to.


Thursday, October 9, 2008

April's Little Beauty 2002


Materials for April Doily: Size 10 cotton crochet thread
Hook 1.75mm
Finished Size: About 7" across at widest points after washing and blocking .
I have got this pattern from

Tuesday, October 7, 2008

Lagoon


Materials:
Size 10 cotton crochet thread
Crochet hook size 0.75 mm about 90 yad
Finished size: About 11 1/2"

Square Pineapple Doily


Materials:
Size 10 cotton crochet thread
Crochet hook size 0.75 mm
Gauge: Rounds 1-3 = 2” across widest part
Finished size: About 8 1/2"

Monday, March 10, 2008

Sunday, March 9, 2008

Gernny favorite doily


Hi! Everyone,
Now I posted my new doilies. I get this pattern to www.freepatterns.com

I am use to
Thread = 10 size 175 yds
Hook = 1.75 mm

Tuesday, February 26, 2008

African Violet

Imade this pair of Doily for my corner tables.
Thread: DMC size 10 About 255 yds.
Hook: 1.75 mm


Sunday, February 3, 2008

Thursday, January 24, 2008

Pink Blush Doily


I will get this pattern from http://freepattterns.com
Welcome Glitter Graphics